Architectural Rendering with SketchUp and Kerkythea
By Nick Howlett
So you’ve made that SketchUp model, and want to turn it into a funky architectural render with minimal effort and without shelling out any money on flash software…. enter Kerkythea, a completely free to download yet suprisingly sophisticated rendering program, which can also conveniantly produce renders with minimal work involved.
This tutorial takes you through the basics (assuming that you can already use SketchUp to some degree), which should be enough for you to try out a few things of your own.
1. Get downloading
Obviously first you need to download and install the latest version of Kerkythea from theKerkythea Application Repository. I’ll assume you can manage that without a tutorial…
Also, download and install as many materials etc. as you can, again from the Kerkythea website. The more you have now, the quicker you can churn out renders later – try the Kerkythea Material and Models Repository to get you started, or search the Kerkythea Forum. To install these into Kerkythea, go to file -> install library and select the zip file you downloaded. If you really can’t be bothered, at least grab a decent glass materials selection as these can be tricky to get right – Basic Glasses, for example.
You’ll also need the exporter so you can export your models from SketchUp to Kerkythea, available in the Kerkythea SketchUp Repository.
Right, let’s get started…
2. The SketchUp part
Assuming you’ve installed the Sketchup exporter, you’ll see this exciting new toolbar. The only buttons you’ll really need are the first, 4th and 5th buttons from the left - number 1 exports the model, and the other two are light components (which I’ll cover in another tutorial, we’ll stick to daylight for now).
So, first create your model – time spent here is definately worth it, your render will never look good without a good model behind it. Some fine detail is always good – I like to add in some funky furniture from the Google SketchUp online component library found at the 3D Warehouse. The components in these packs are pre-drawn SketchUp models of useful objects like furniture, cars and trees.
Any materials you apply in SketchUp, the sun and shadows, and any scenes are all exported into Kerkythea, and in many ways it’s easier to set all this up in SketchUp.
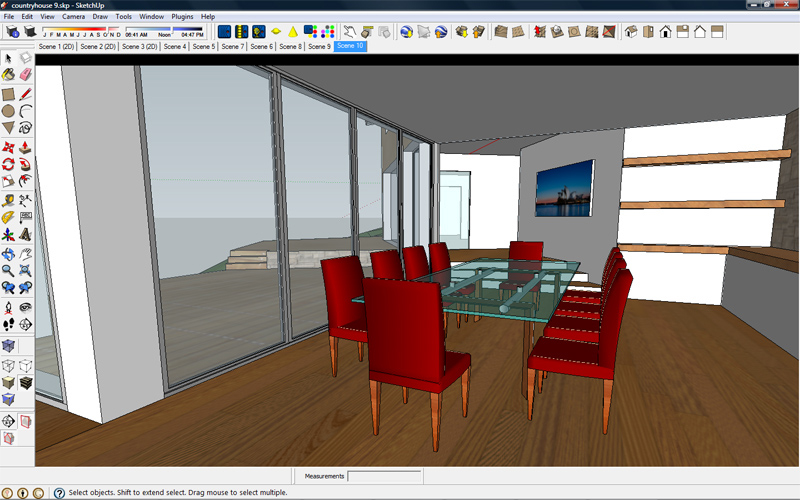
Kerkythea works by separating parts of your model by material, so anything you want rendering differently needs to have a different material applied to it. So here’s a model I made earlier, with some extra furniture from the web - I’ve already got a floorboards texture I like, so have applied that all over the floor in SketchUp. Since I want the glass of the table and the glass in the windows to render differently, I’ve given them different sketchup textures (which I’ll then play around with inside Kerkythea). A photo applied in the background is a nice touch that I find helps add to the realism.
Notice I’ve also set up a few scenes – although you can navigate around your model in Kerkythea, it’s a right pain and it’s much easier to do it in Sketchup – we’ll have a go at rendering this one.
Since we want a nice sunny image, next we’ll set up the sun and shadows – set your location on window -> model info, then get some shadows in a place that lights the image nicely, something like this:
Right, that will do for now, so hit the ‘Export model to Kerkythea’ on the new toolbar and let the fun begin… make sure you’ve got ’Export Geometry’ and ‘Export Lights’ set to ‘Yes’, and the others set to ‘No’.
3. Getting into Kerkythea
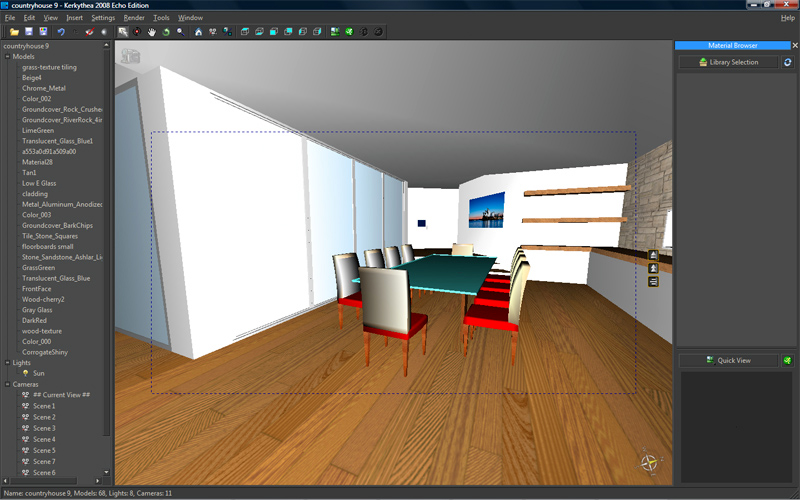
Fire up Kerkythea and off we go. Click on File -> Open and select the XML file that you just exported from SketchUp. It should appear inside Kerkythea in wireframe mode. I like to change this into solid rendering mode by going View ->Adjust -> Solid Rendering, or by pressing V on the keyboard. It should look like the view below, don’t worry, it won’t look anything like this once it’s rendered!
Let’s look at the user interface briefly. Under the main menu are some quick links – the first set do the usual open/close stuff, the next block are the tools for navigating around your model (which we’ll ignore as our scenes are already set up), then there’s some links to certain views (which we’ll again ignore) and finally some render buttons, which obviously we’ll be using later.
The most important part to look at is the long list down the left hand side. This lists firstly all the different materials used in the model, then the lights (in this case just the sun), then the cameras (views) that we already set up. Double click on a material and anything that is covered with that in the scene is selected. Alternatively, you can click on parts of the model, and the corresponding material will be selected in the list.
At this stage you could just click render, but a few short minutes work will greatly imrove the image!
4. Setting some materials
First we’ll make a few of the materials we applied in SketchUp look a little better in the final render.
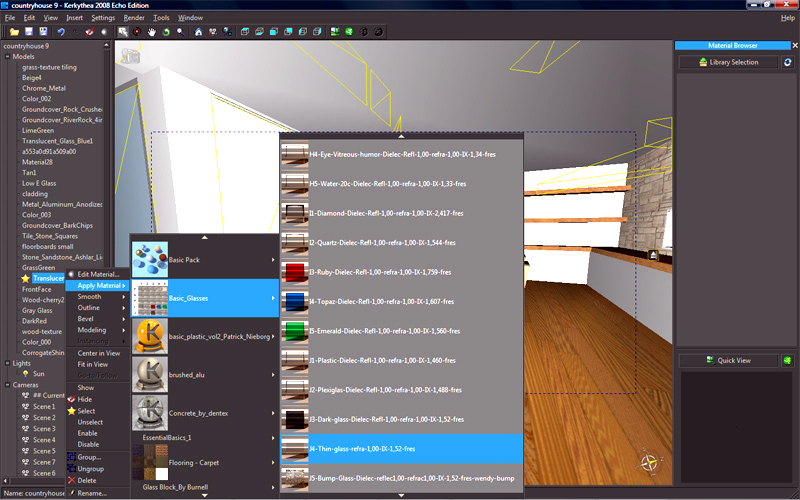
Glass is sometimes tricky to get right, and doesn’t render as transparent without a few changes, so we will apply a new texture inside Kerkythea. First click on the window in the model – it gets outlined in yellow and the corresponding material is highlighted in the left pane. Right click on this, and go to apply material. You will be greeted with a list of all the material libraries you downloaded and installed earlier. In order to get decent shadows through the windows, we ideally want a thin glass material. The Basic Glasses pack has a good one, so I’ve navigated into there, then selected the Thin Glass material two from the bottom of the list.
I then did the same for the glass table top, but selected an exciting frosted glass texture from a different library. Don’t worry if the model starts to look a bit odd, it should still render ok.
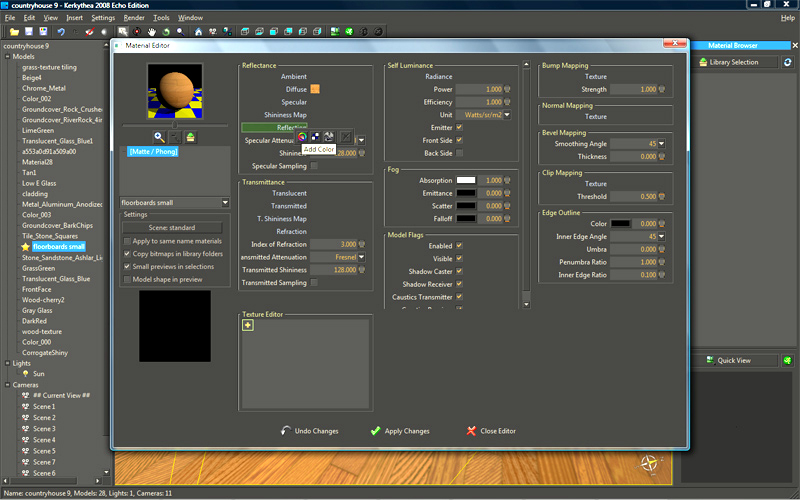
Kerkythea also allows you to create or modify textures to your own specification, by right clicking on a material in the left pane and going to Edit Material. The diolog that opens gives an amazing array of options, but we’ll stick to something simple – I’m going to add a slight reflection to the floorboards texture to make it look polished. So, on the edit material diolog for the floorboards, right click where it says Reflection then click on Add Colour.
Choose a darkish grey then click Accept, The sphere in the top-left corner of the Edit Material box (that shows a preview of the texture) should change to show a slight reflection. Subtlety is the key here, so don’t overdo it – the lighter the grey, the more reflection. Obviously, if you want to create, for example, a mirror then pump this up to maximum.
After fiddling with a few more materials, we’re done.
5. Sky and scenery
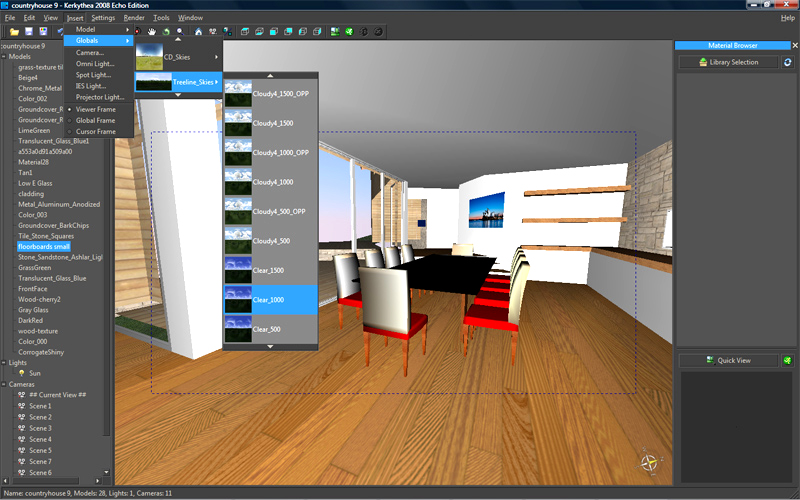
For an added touch of realism, we’re going to add in a ‘global’, which is essentially an image that wraps all the way around the model. This one will add in a treeline on the horizon and a realistic looking sky, and is from a set that I’ve aready downloaded.
Go to Insert -> Globals, then navigate to the one you want – I’ve gone for ‘Clear 1000′
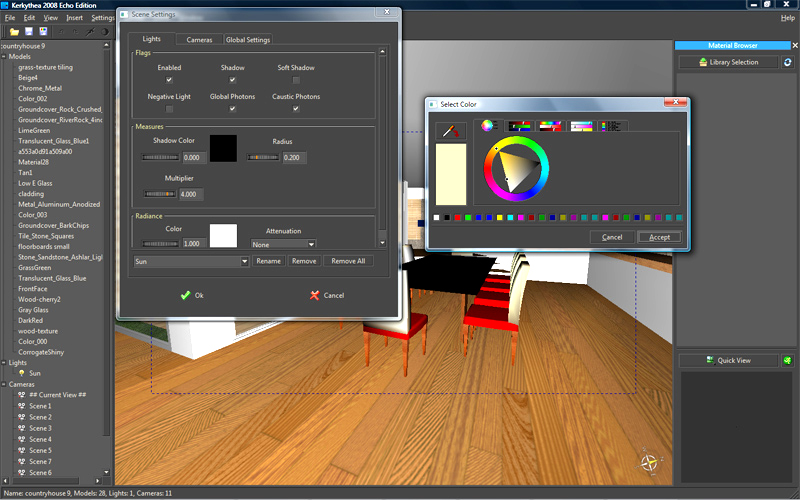
Now for one final bit of setting up, and we’re ready to render - this part isn’t essential but I like to think it adds a certain something. Go to Settings -> Scene – again this provides a plethora of options, we’re going to play around with the only light in our scene, the sun. Usually, I up the Multiplier factor to 4, and set the Radiance colour to a slight yellow tint. Click OK and we’re done.
6. Let’s get rendering
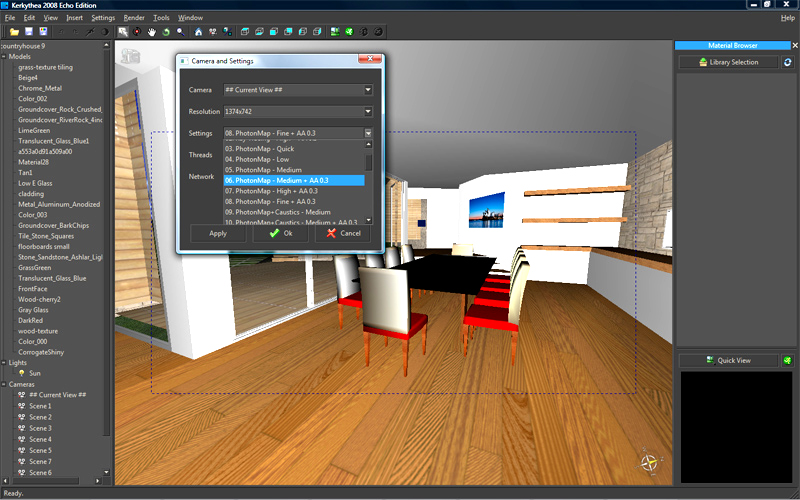
Once again there’s loads of settings that can be played with here, but we’re going to shortcut most of that. So, clickRender -> Start - first set which view we’re going to render (in this case I’ve left it as what’s currently showing), then the output resolution (size of the image). The default will be whatever size SketchUp exported it as, but the size you want will depend on what you want the render for. It’s usually a good idea to try a few test ones at low resolution first, then up it for your final image.
The final stage of this tutorial is the Settings box. If you’ve got time, it’s worth playing around with a few of the presets on the list, but if not the PhotonMap ones are usually best (again use a low quality one for test renders, then up it for the final one). And thats it! Click OK and sit back whilst your image renders – the black square in the bottom right shows a preview of the final image as it is processed. You can also access a larger view (and view your final creation) by clicking Window -> Rendered Image (or by clicking the button on the toolbar).
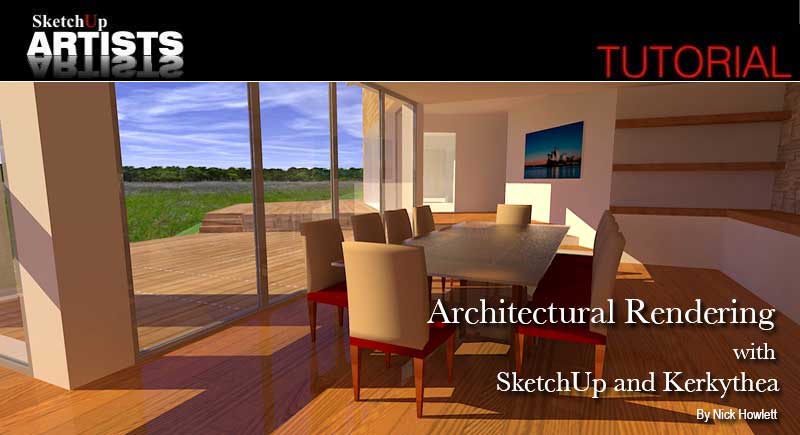
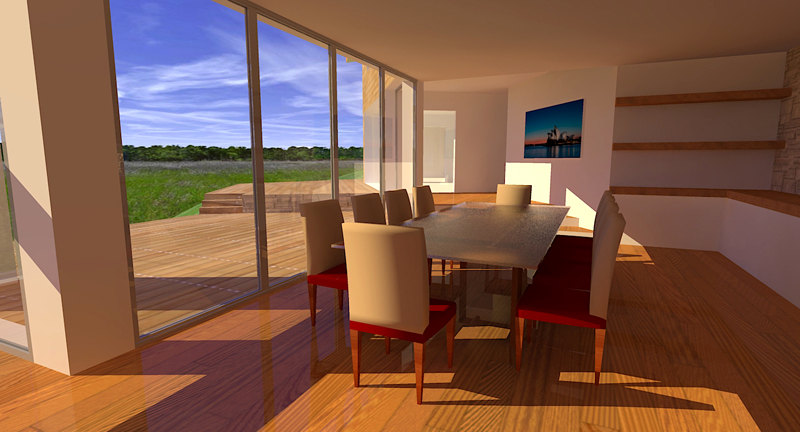
Here is the final result of what our (not particularly) hard work looks like:
Not a bad effort, a few extra objects would add to the realism of the scene, as would a few more detailed textures (maybe some fabric on the chairs, or some depth to the floorboards) and the exterior scene could be improved, but otherwise not bad.
In conclusion, Kerkythea can be used to quite quickly create decent quality renders. Remember there are 3 main factors in a good render (in my opinion) – a good model, good lighting and good materials – get those 3 right and you can’t fail!




1 komentar:
You have not got permission to post this tutorial here or any others from SketchUpArtists. You haven't even posted links back to the original site or given any credit to the authors.. Please remove immediately or action will be taken.
James Hannigan
Online Editor
sketchupartists.org
Posting Komentar