


This is default featured post 1 title
Visi adalah suatu pandangan jauh tentang perusahaan, tujuan - tujuan perusahaan dan apa yang harus dilakukan untuk mencapai tujuan tersebut pada masa yang akan datang. Visi itu tidak dapat dituliskan secara lebih jelas menerangkan detail gambaran sistem yang ditujunya, dikarenakan perubahan ilmu serta situasi yang sulit diprediksi selama masa yang panjang tersebut. Beberapa persyaratan yang hendaknya dipenuhi oleh suatu pernyataan visi: by iqbalarch.co.cc.

This is default featured post 2 title
Go to Blogger edit html and find these sentences.Now replace these sentences with your own descriptions.This theme is Bloggerized by Lasantha Bandara - Premiumbloggertemplates.com.

This is default featured post 3 title
Go to Blogger edit html and find these sentences.Now replace these sentences with your own descriptions.This theme is Bloggerized by Lasantha Bandara - Premiumbloggertemplates.com.

This is default featured post 4 title
Go to Blogger edit html and find these sentences.Now replace these sentences with your own descriptions.This theme is Bloggerized by Lasantha Bandara - Premiumbloggertemplates.com.

This is default featured post 5 title
Go to Blogger edit html and find these sentences.Now replace these sentences with your own descriptions.This theme is Bloggerized by Lasantha Bandara - Premiumbloggertemplates.com.
Minggu, 14 Oktober 2012
Kamis, 17 Mei 2012
How to create Pool Water in Vray Sketchup
TIPS AND TRICKS | ||
How to create Pool Water in Vray Sketchup | ||
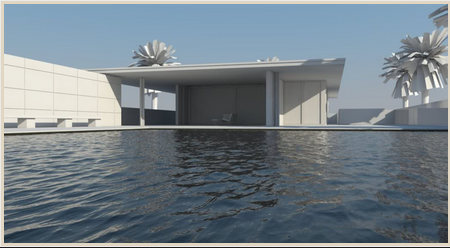
I want to share my latest tutorial: How to create Pool water in Vray SketchUp. I do hope in this tutorial, you will not only learn about the Vray pool water material, but also how the UV mapping works in Vray SketchUp. I will also touch base about "effected material" in clay rendering.
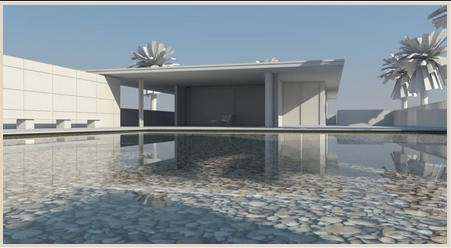
Here is the model I will be using in this tutorial "Barcelona Pavilion" design of course by Mies Van Der Rohe. This was modelled by Fernando Perez Alvarado.
We are using this model in our September 2011 Challenge at Sketchup Vray Artist Facebook Group. If you have Facebook account and want to view some of the entries and join this group, Click HERE. Be mindful, this group was intended originally for the Filipinos who are using SketchUp; therefore from time to time, local dialect is used. But don't worry, the members are accommodating; if they knew you are a non-Filipino, they are more than willing to respond and talk with you in English.
Here is the setup view of the model that I will be using. I will render in clay rendering, only the water and pebble materials will not be effected by the override material function. If you want to do clay render in Vray SketchUp, go to the global switches in the Vray options and tick override materials.
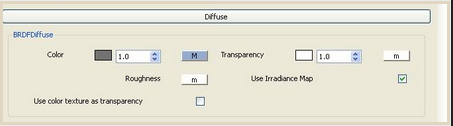
Step 1: The Diffuse Layer
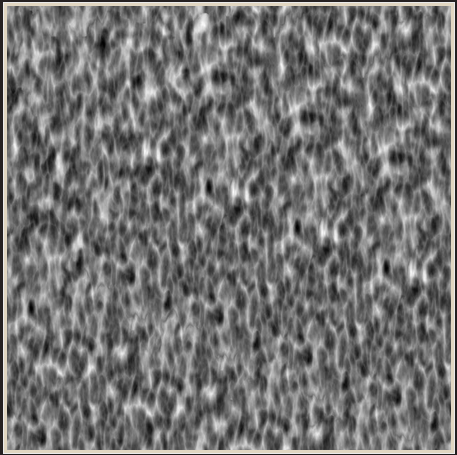
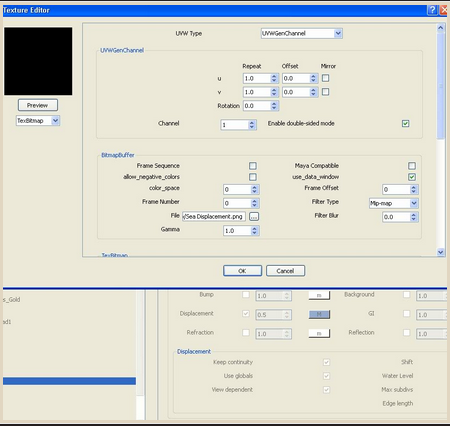
1.1. Here is the displace map that I will be using here. It is a seamless texture I made with Pixplant. You can copy this image and use it personally.
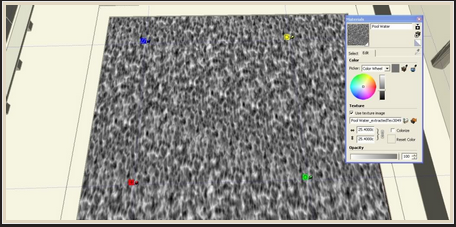
1.2. Here I applied the map in my water material using SketchUp
1.3. Once satisfied with the mapping scale, you can turn the opacity to zero (0)- meaning it is full transparent. Vray SketchUp will use the UV map of the top diffuse layer. So if we add displacement height, the displaced map will follow the UV of this layer. There are two ways how to adjust the map's opacity.
a. by SketchUp Material Editor
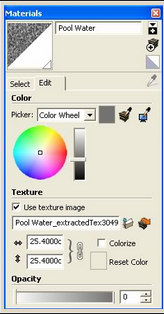
b. by Vray Material Editor. White color in the transparency slot means 100% transparent.
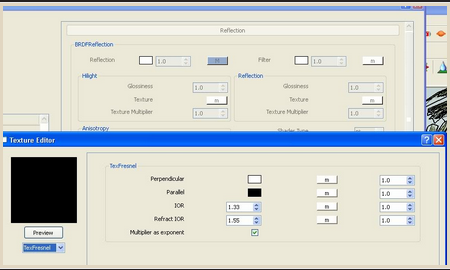
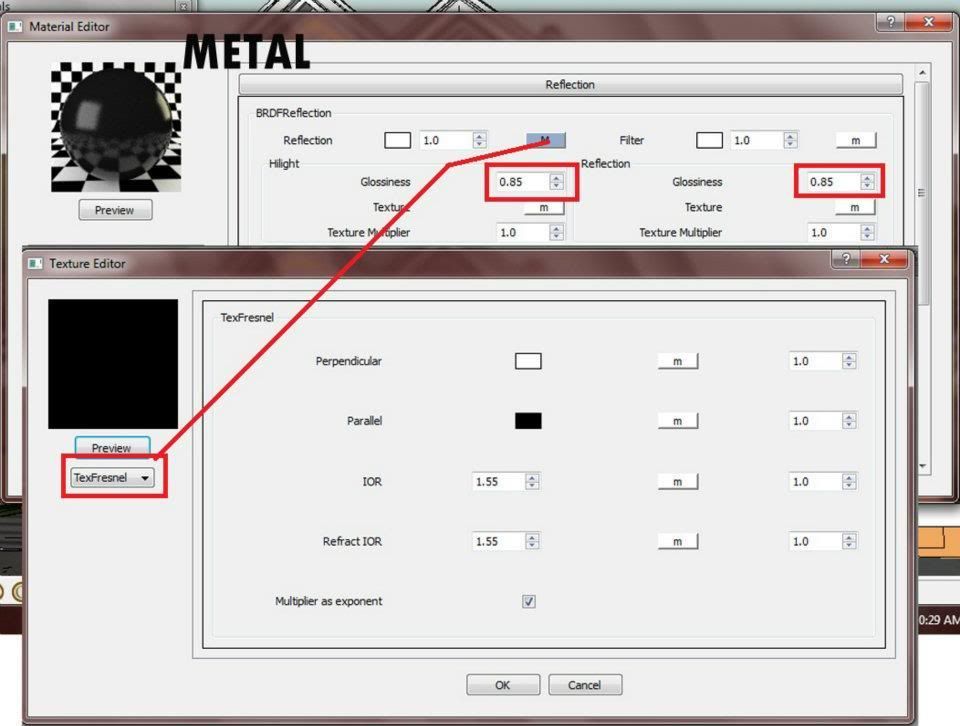
Step 2: The Reflection Layer
I added Fresnel Map on the reflection layer, with an Index of Refraction (IOR) value of 1.33
Step 3: The Refraction Layer
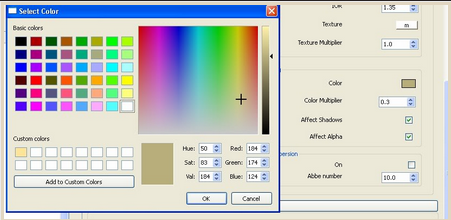
For me this is one of the most important layer that anyone should focus when dealing with water material. Under refraction, I will share the three main items for this material: Tranparency, IOR and Fog Color.
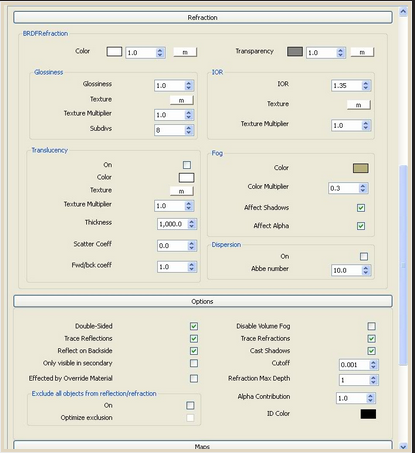
3.1. IOR Value.. in the IOR value (see the image above), I used 1.33. This is the IOR value of water.
3.2. Fog Color. Fog color controls the color basically of your water material. If you want an effect of pristine water for resort pools, then you might want to use light turquosie or light blue color tints. If you want a bit murky water, then use ochre to brownish shades.
The color multiplier, controls the thickness effect of the color. higher value makes the color more intense. For me my multiplier will vary from .01 to .03. If you want the shadows to pass through then you need to tick, affect shadows. If you want the color to pass through (like in stained glass) then you need to tick affect alpha.
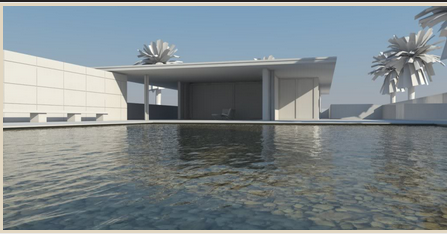
ok let say, I will choose this fog color (RGB 184,174, 124)
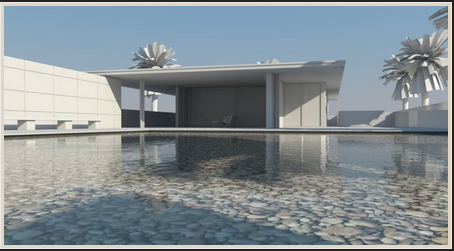
Here is the render. Note: In this render I have added displacement, and grayish transparency color
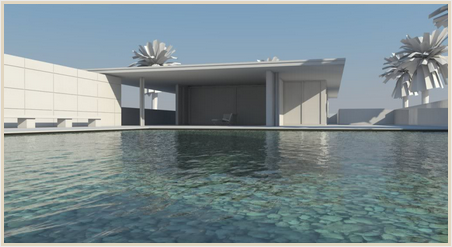
If I want greenish color, I might choose this color
Here is the render using greenish color.

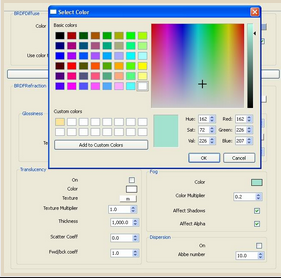
3.3. Transparency color.
Usually, it so hard to see what is happening below the surface, especially when using high displacement value and reflective valuer. If you want to see the material below, in this case the pebble rocks, you should learn how to adjust this. I have seen water that looks like metal or sea water, because this one was 100 percent white.
Here is an example. This one looks like seawater. (This render has displacement value of 1.0 and transparency color of white)
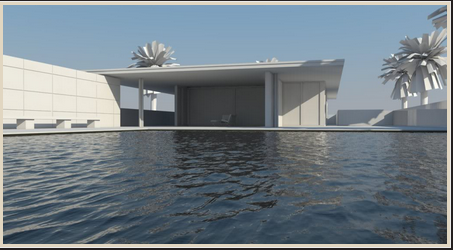
In the Barcelona Pavilion, the pebble surface is quiet near to the water surface, therefore the pebbles will be surely noticed. TO see the texture at the bottom, first you need to make the displacement lower and second you need to use medium to dark gray color in the transparency rollout. Below, I adjusted the transparency color with an RGB value of 81,81,81.

Here is the render (without displacement)
Step 4: Displacement
To create waves and ripples, all we need to do is to add displacement map. Be sure your face geometry for your water is grouped. If not, no displacement will occur. Here I used the same dmap , I used in the diffuse layer.
To create waves and ripples, all we need to do is to add displacement map. Be sure your face geometry for your water is grouped. If not, no displacement will occur. Here I used the same dmap , I used in the diffuse layer.
Examples of displacement settings. Note: Vray uses inches in displacement. 1 means 1 inch.
Displacement amount 0.1
Displacement amount 0.5
Displacement amount 1.0
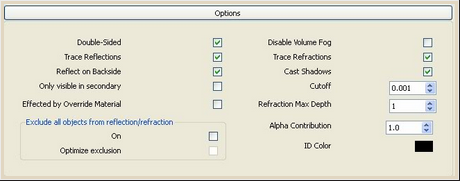
Bonus: Effected by Override Material
If you want the material not to be effected when overriding material (for clay rendering) all you have to do is untick "effected by Override Material" under option.
See some of my WIP renders in this challenge using this tutorial. DAY 1, DAY 2. I have not updated it.
I hope this is useful.


Making Of Class Room
The ‘Classic Room’ scene was fully modeled in Google SketchUp with the help of some free available plug-ins.
It is a classic style room with details of moldings, illuminated with natural light from the scene and only the light support in the middle of the room is a resolved V-Ray emitting material. After the modeling process I will apply the textures, at the same time doing various tests to adjust the lighting and reflections of different materials.
I will finish without placing an environment (background), that I will add later in Photoshop . I must therefore save the rendered image in Png format because it supports different opacities of materials.

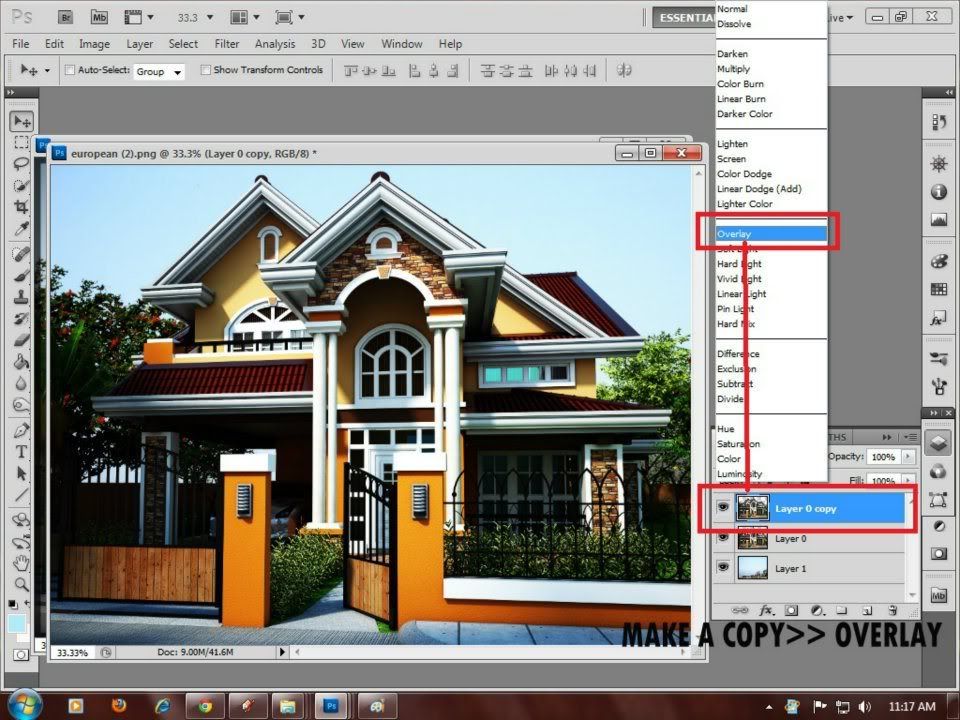
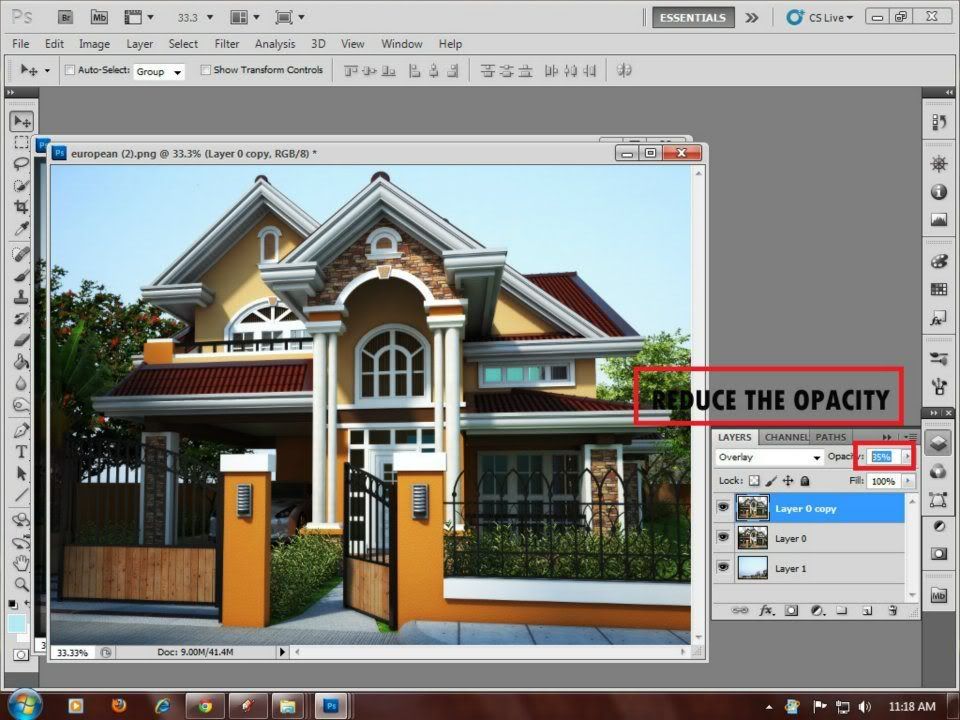
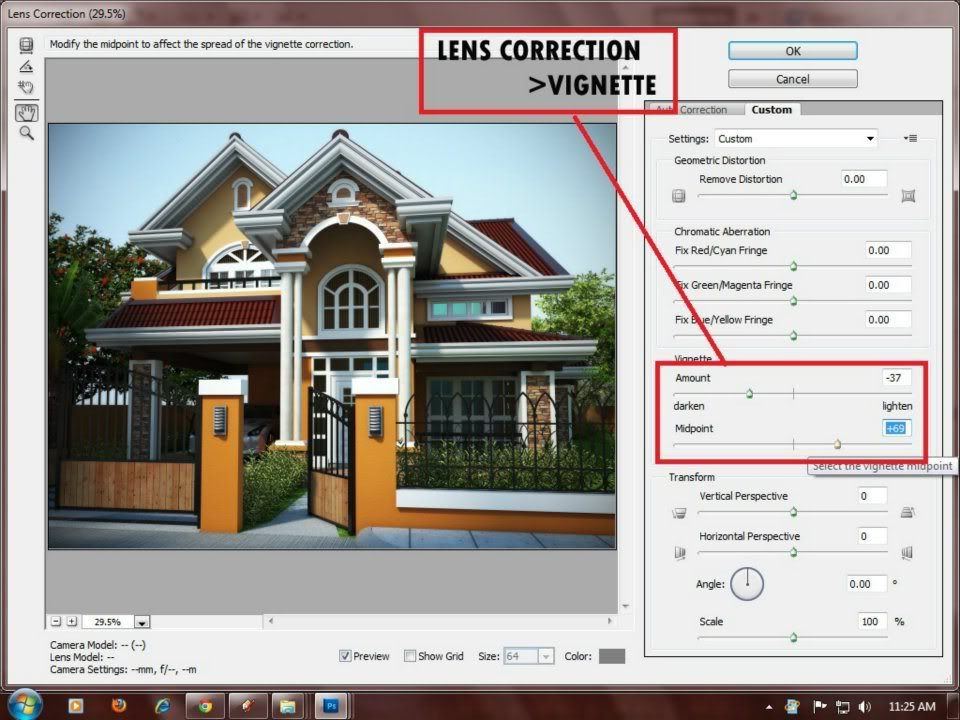
In addition to adding a Photoshop background (a high-resolution image of a landscape), I must adjust the contrast, lighting levels, glare and blur, add a second layer which I will merge with the original layer using the overlay method , then lower the opacity from 25 to 30%. These settings are of course very subjective and depend very much on each and every individual case, scene, taste, lighting situation…

Step 1
Step 1. Here is the original SketchUp scene I started with . All the details are clearly visible before the rendering and post- production process.

Step 2
Step 2. Rendering Options in V-Ray 1.5

Step 3
Step 3. Rendering Options in V-Ray 1.5 (Continued)

Step 4
Step 4. Rendering Options in V-Ray 1.5 (continued)

Step 5
Step 5. Rendering Options in V-Ray 1.5 (continued)

Step 6
Step 6. Rendering Options in V-Ray 1.5 (continued)

Step 7
Step 7. Rendering Options in V-Ray 1.5 (continued)

Step 8
Step 8. Rendering Options in V-Ray 1.5 (continued)

Step 9
Step 9. Rendering Options in V-Ray 1.5 (continued)

Step 10
Step 10. Rendering Options in V-Ray 1.5 (continued)

Step 11
Step 11. Rendering Options in V-Ray 1.5 (continued)

Step 12
Step 12. Rendering Options in V-Ray 1.5 (continued)

Step 13
Step 13. Rendering Options in V-Ray 1.5 (continued)

Step 14
Step 14. The chandelier is a diffusion material. Later in post-production (Photoshop) a diffuse glow effect is applied.

Step 15
Step 15. This is the original image exported from SketchUp

Step 16
Step 16. This is the render output as it came out of the render engine. Before the post-production process in Photoshop it is necessary to adjust different light settings and color corrections as detailed below.

Step 17
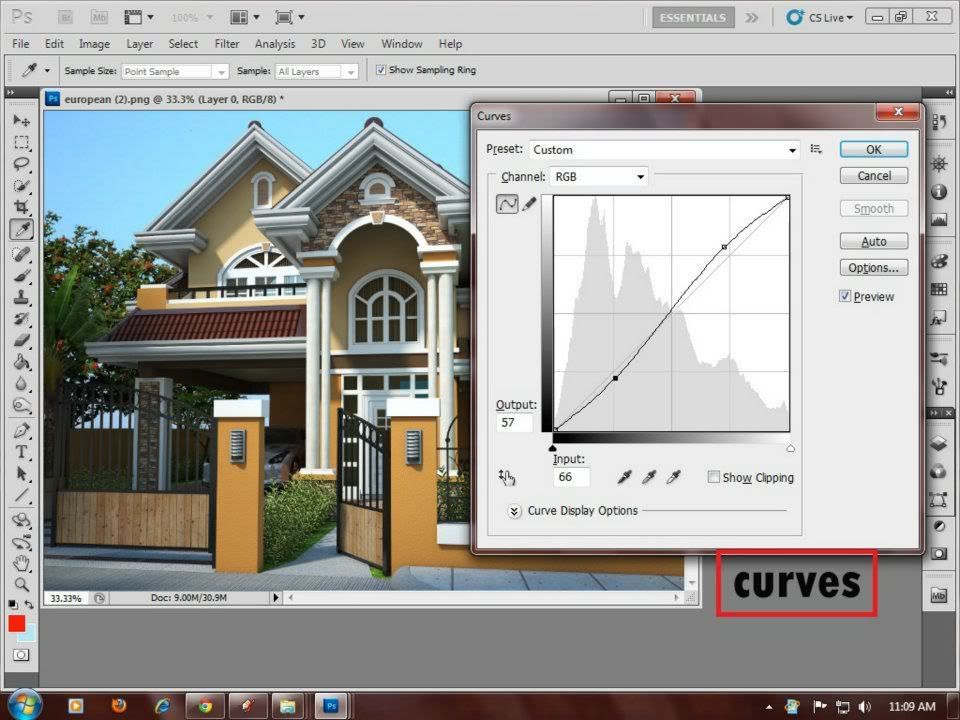
Step 17. Correction of Levels in Photoshop will improve the overall lighting of the scene.

Step 18
Step 18. Correction of Brightness and Contrast will give greater depth to the lighting of the image.

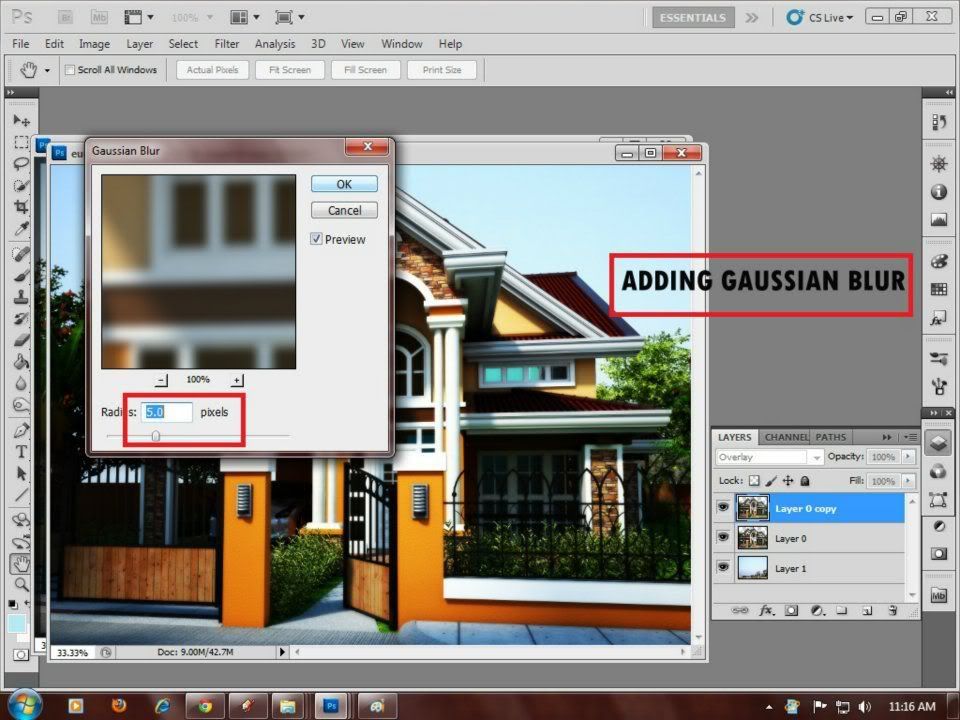
Step 19
Step 19. Before applying Gaussian Blur, it is necessary to duplicate the original layer (Ctrl + j).

Step 20
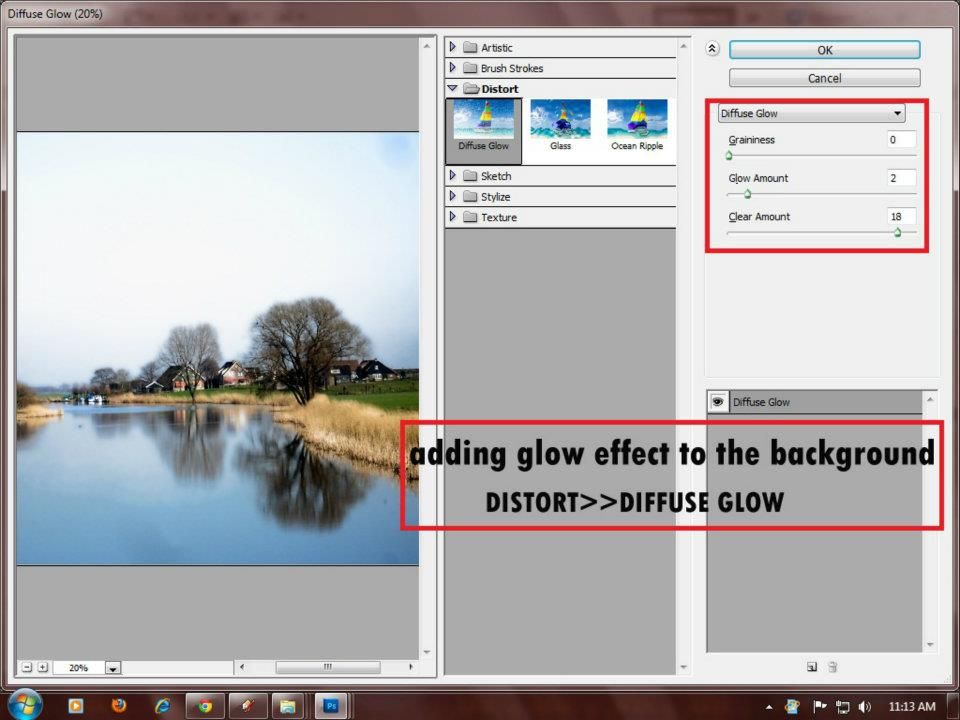
Step 20. Apply a slight Gaussian Blur. Besides using the Gaussian Blur filter an option is also to apply a diffuse glow to give more radiance to the highlights of the scene.

Step 21
Step 21. In the Blending Options> Layer >Soft Light adjusting Opacity up and down until (about) 30%.

Step 22
Step 22. A high resolution landscape image is applied as the background.

Final Image
This is the finished image after rendering, lighting adjustments and incorporation of the background image in Photoshop.
I hope you enjoyed my tutorial.